Introduction: Why Proper Reconstitution Matters
Reconstitution — the process of dissolving a lyophilized (freeze-dried) peptide powder into a liquid solution — is a critical laboratory step that directly affects experimental reliability. Improper reconstitution can introduce degradation, aggregation, microbial contamination, or inaccurate concentrations, any of which can compromise downstream results.[1]
Most research peptides are supplied in lyophilized form because the dry state provides significantly greater chemical stability compared to solutions. Reconstitution converts this stable powder into a working solution for laboratory use. This guide provides a step-by-step protocol based on established pharmaceutical and biochemistry practices, covering solvent selection, aseptic technique, concentration calculations, and post-reconstitution storage.
Materials Required
Before beginning reconstitution, gather all required materials to maintain workflow efficiency and minimize the time the peptide is exposed to ambient conditions. Essential supplies include the lyophilized peptide vial (confirmed against the Certificate of Analysis), an appropriate reconstitution solvent (discussed below), sterile syringes with appropriate gauge needles (typically 18-21 gauge for solvent transfer), alcohol preparation pads for disinfecting vial stoppers, and sterile microcentrifuge tubes or aliquot vials if the reconstituted solution will be divided into smaller volumes for storage.
Step 1: Select the Appropriate Solvent
Solvent selection is the most important decision in peptide reconstitution, as the wrong solvent can cause precipitation, denaturation, or loss of biological activity. The choice depends on the peptide's physicochemical properties — primarily its hydrophobicity, charge characteristics, and known stability profile.[1]
Bacteriostatic water (sterile water containing 0.9% benzyl alcohol) is the most commonly used solvent for research peptide reconstitution. The benzyl alcohol serves as a preservative that inhibits microbial growth, making the solution suitable for multiple withdrawals over a period of up to 28 days when stored at 2-8°C. The slightly acidic pH (typically 4.5-7.0) is compatible with most peptides.[2]
Sterile water for injection (WFI) is preservative-free and is appropriate for single-use applications or for peptides that may be sensitive to benzyl alcohol. However, because it lacks antimicrobial protection, any reconstituted solution should be used promptly or aliquoted and frozen. Normal saline (0.9% sodium chloride) may be preferred when isotonicity is important for downstream cell-based assays. For hydrophobic peptides that resist dissolution in aqueous solvents, a small amount of dilute acetic acid (up to 10%), dimethyl sulfoxide (DMSO), or acetonitrile may be added to improve solubility before further dilution with aqueous buffer.[1]
Specific peptides may have unique solvent requirements based on their chemical properties. For example, BPC-157 is generally soluble in aqueous solutions at physiological pH but shows pH-dependent stability. GHK-Cu, as a copper-complexed peptide, requires attention to metal chelation — solvents containing EDTA or strong chelators should be avoided as they can strip the copper ion essential for biological activity.
Step 2: Prepare the Workspace
Reconstitution should be performed in a clean environment to minimize the risk of microbial contamination. Ideally, work within a laminar flow hood or biological safety cabinet. If a clean bench is not available, work on a recently disinfected surface away from drafts and foot traffic.[3]
Wash hands thoroughly and consider wearing nitrile gloves. Arrange all materials within reach before opening any vials to minimize handling time.
Step 3: Equilibrate and Inspect
Remove the lyophilized peptide vial from cold storage and allow it to equilibrate to room temperature for approximately 15-30 minutes before opening. Opening a cold vial can cause moisture condensation inside the vial, which may partially dissolve or degrade the lyophilized cake before the full solvent volume is added.[2]
While the vial equilibrates, inspect the lyophilized product. The peptide should appear as a white to off-white powder or a loose, porous cake. Discoloration (yellow, brown, or gray tones) may indicate oxidation or other degradation. Check the lot number against the Certificate of Analysis to confirm identity before proceeding.
Step 4: Calculate the Target Concentration
Before adding solvent, determine the desired final concentration. The basic calculation is straightforward: volume of solvent (mL) equals the mass of peptide (mg) divided by the desired concentration (mg/mL).
For example, if a vial contains 5 mg of peptide and you want a 1 mg/mL solution, you would add 5 mL of solvent. For a more concentrated 5 mg/mL solution from the same vial, you would add 1 mL.
An important consideration is the distinction between gross weight and peptide content. The weight listed on the vial label may represent gross weight (total powder including counterions, water, and salts) rather than net peptide content. For precise quantitative work, use the peptide content value from the COA rather than the label weight to calculate concentrations. The difference can be significant — net peptide content typically ranges from 60-85% of gross weight depending on the counterion and residual moisture.[4]
Step 5: Add Solvent Using Proper Technique
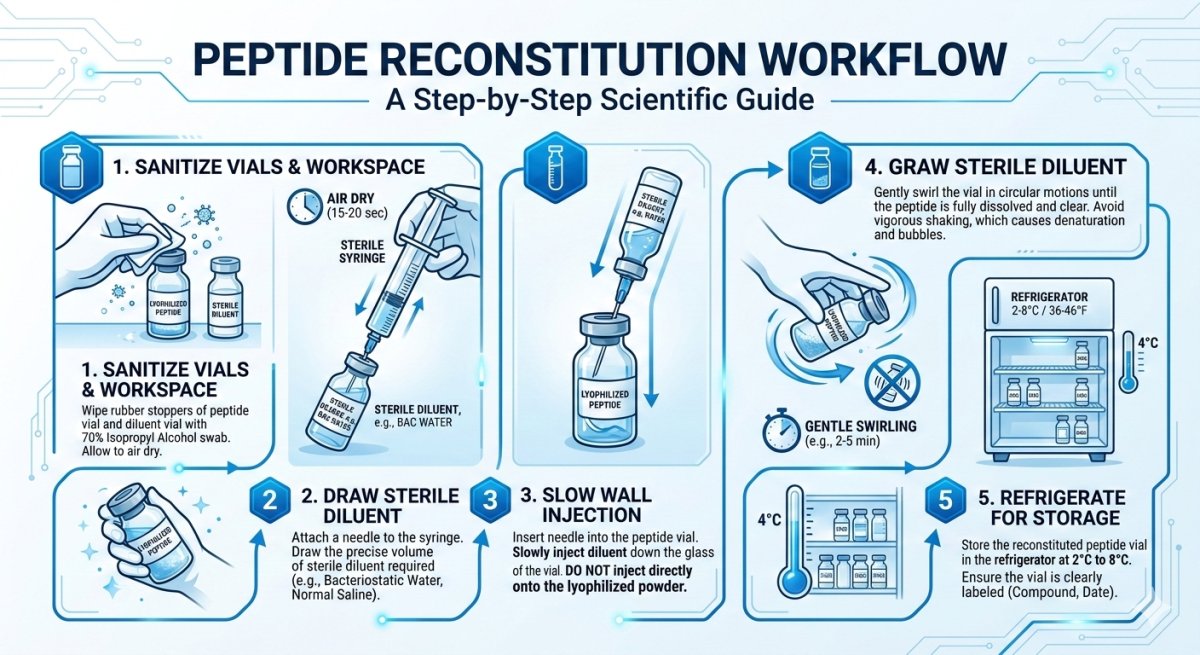
Disinfect the rubber stopper of both the peptide vial and the solvent vial with an alcohol preparation pad and allow to air dry completely (approximately 30 seconds). Draw the calculated volume of solvent into a sterile syringe.[3]
Insert the needle through the peptide vial stopper and direct the solvent stream along the inner wall of the vial, not directly onto the lyophilized powder. This gentle approach minimizes foaming and physical disruption of the peptide. Add the solvent slowly — rapid injection can create bubbles, generate foam, and cause mechanical stress that promotes aggregation.[1]
After adding the full solvent volume, withdraw the needle and gently swirl the vial in a circular motion to promote dissolution. Avoid vigorous shaking, as this can cause peptide aggregation at the air-liquid interface and potentially denature the peptide. Most properly lyophilized peptides will dissolve within 1-5 minutes of gentle swirling. Some peptides may require brief periods of gentle agitation followed by rest at room temperature.
Step 6: Verify Dissolution
After reconstitution, visually inspect the solution. A properly reconstituted peptide solution should be clear and colorless to slightly translucent. Visible particles, persistent cloudiness, or foam that does not dissipate within a few minutes may indicate incomplete dissolution, aggregation, or incompatibility with the chosen solvent.[1]
If the peptide does not fully dissolve, consider the following approaches before discarding: allow additional time (some peptides dissolve slowly), gently warm the vial briefly to room temperature if it has cooled during handling, or add a small volume of a co-solvent such as dilute acetic acid or DMSO to aid dissolution. Never sonicate peptide solutions unless the specific protocol calls for it, as ultrasonic energy can fragment certain peptide sequences.
Step 7: Aliquot for Storage
To preserve peptide stability and avoid repeated freeze-thaw cycles, divide the reconstituted solution into single-use aliquots immediately after reconstitution. Transfer measured volumes into sterile, labeled microcentrifuge tubes using a calibrated pipette or sterile syringe. Each aliquot should contain enough volume for one experiment or one day of use.[2]
Label each aliquot with the peptide name, lot number, concentration, reconstitution date, and solvent used. This documentation supports experimental traceability and is part of good laboratory practice.
Post-Reconstitution Storage
Reconstituted peptide solutions are significantly less stable than their lyophilized counterparts and must be stored appropriately. As a general guideline, solutions reconstituted in bacteriostatic water can be refrigerated at 2-8°C and used within 28 days, with the benzyl alcohol preservative maintaining microbial suppression throughout this period. Solutions in sterile water without preservative should be used within 24 hours if refrigerated, or aliquoted and frozen immediately.[2]
For longer-term storage, frozen aliquots at -20°C are suitable for most peptides for up to several months, while -80°C extends stability further. Avoid repeated freeze-thaw cycles, as each cycle can promote aggregation and degradation — this is the primary reason for aliquoting. The stability profile varies considerably between peptides: some are robust at refrigerator temperatures for weeks, while others degrade rapidly once in solution. Consulting peptide-specific stability data is essential. Our articles on BPC-157 stability and storage and GHK-Cu handling and storage provide compound-specific guidance for two widely studied peptides.[5]
Troubleshooting Common Reconstitution Issues
Peptide Will Not Dissolve
Try adding a small amount of dilute acetic acid (up to 10%) or DMSO to improve solubility, then dilute further with aqueous buffer. Highly hydrophobic peptides or those with extensive beta-sheet structure may resist aqueous dissolution. Check the peptide's isoelectric point — adjusting the pH away from the pI can improve solubility by increasing net charge.[1]
Solution Appears Cloudy or Contains Particles
Cloudiness may indicate aggregation or incomplete dissolution. Allow additional time for dissolution and gently swirl again. If persistent, the peptide may have degraded during storage or the solvent may be incompatible. Do not use a cloudy solution for experiments — inaccurate concentration and potential aggregate toxicity in cell-based assays can compromise results.
Foaming During Reconstitution
Foam forms when air is trapped during rapid solvent addition. Inject solvent slowly along the vial wall. If foam has already formed, allow the vial to sit undisturbed at room temperature for 15-30 minutes — most foam will dissipate. Do not shake the vial to try to eliminate foam, as this will worsen the problem.
Concern About Peptide Degradation
If reconstituted peptide shows unexpected behavior in assays, degradation may have occurred during storage or reconstitution. Comparing the results against the Certificate of Analysis specifications or submitting an aliquot for third-party purity re-testing via HPLC can help determine whether the material has degraded since the original quality testing was performed.
Best Practices Summary
Successful peptide reconstitution requires attention to several interconnected factors. Selecting the right solvent based on the peptide's properties and consulting any available stability data is foundational. Working in a clean environment with sterile materials protects against contamination. Using the peptide content value (not just the label weight) for concentration calculations ensures accurate dosing. Adding solvent gently along the vial wall, swirling rather than shaking, and allowing adequate dissolution time all minimize physical stress on the peptide. Aliquoting immediately and storing under appropriate conditions preserves the material for future use.[3]
For researchers new to peptide work, our introductory guide on what research peptides are and our overview of how peptides work in laboratory research provide broader context on handling these materials. Understanding peptide purity is also essential, as the reconstitution process assumes the starting material meets appropriate quality standards.
Conclusion
Reconstitution is a deceptively simple procedure that has a substantial impact on downstream experimental quality. By following established protocols — selecting appropriate solvents, maintaining aseptic technique, calculating concentrations from peptide content rather than gross weight, and storing reconstituted solutions properly — researchers can maximize the usability and reliability of their peptide materials.
As with all aspects of peptide research, careful documentation and adherence to good laboratory practices ensure that results are reproducible and scientifically meaningful.
This content is provided for educational and laboratory research purposes only.